Eyesis outdoor panorama sets and the Viewer/Editor
This April we attached Eyesis camera to a backpack and took it to the Southern Utah. Unfortunately I did not finish the IMU hardware then so we could rely only on a GPS for tagging the imagery. GPS alone can work when the camera is on the car, but with a camera moving at pedestrian speed (images were taken 1-1.5 meters apart) it was insufficient even in the open areas with a clear view of the sky. Additionally, camera orientation was changing much more than when it is attached to a car that moves (normally) in the direction the wheels can roll. Before moving forward with the IMU data processing we decided to try to orient/place some of the imagery we took manually – just by looking through the panoramas, adjusting the camera heading/tilt/roll to make them look level and oriented so the next camera location matches the map. Just tweaking the KML file with the text editor seemed impractical to adjust hundreds of panoramic images so we decided to add more functionality to our simple WebGL panorama viewer, make it suitable for both walking through the panorama sets and for the editing orientations and locations of the camera spots.
WebGL and large textures
Our first panorama textures were both small (8192×4096 pixels) and dimensions were power of two – initially I could not make it work with Non-power of two (NPOT) textures. The actual Eyesis panoramas are larger (resolution is set to match camera pixels at the equator) , so that initial texture size was good just for the first experiments. The problem with the NPOT was rather easy to solve, solution is described on the Khronos.org wiki, not just the minification filter should not use mipmapping (I made sure it did not before), but repeat mode should set to CLAMP_2_EDGE (I still do not fully understand that as we do not use any repeated textures). Anyway, couple extra lines of magic did the trick:
gl.texParameteri(gl.TEXTURE_2D, gl.TEXTURE_MIN_FILTER, gl.LINEAR);

gl.texParameteri(gl.TEXTURE_2D, gl.TEXTURE_WRAP_S, gl.CLAMP_TO_EDGE);

gl.texParameteri(gl.TEXTURE_2D, gl.TEXTURE_WRAP_T, gl.CLAMP_TO_EDGE);
So it did work on my computer with 14,272×7,136 images. Worked on the computer I was using at the moment, but not on the two others we tried – still black screen instead of the nice scenery. So probably those other computers had less capable graphic card, so we tried to investigate – where is the limit. Is it the size of individual textures or the total amount of the texture data transferred to the graphic card memory. The viewer had the capability to specify number of simultaneously loaded panoramas, but changing that parameter did not seem to make any difference. So next thing was to split the single image that was put on the sphere, as in the nice WebGL lesson into several tiles. To make it easier to experiment I modified the sphere model to use variable number of tiles and just splitting the full 14,272×7,136 into two square ones of 7,136×7,136 made it work on those two computers that failed initially – the limit seemed to be at 8192 as the tile dimension in each direction, anything 8192×8192 or under seemed to work on our other computers of different types. To play it safe we split images once more in each direction to the total of 8 tiles, adding suffixes to the filenames, i.e. texture.jpeg was split into texture_1_2.jpeg and into texture_2_2.jpeg (1 of 2 and 2 of 2), or texture_1_8.jpeg, … texture_8_8.jpeg ( 1 of 8, … 8 of 8 ) – with such naming we could keep different tiling files in the same directory and have just the original (texture.jpeg) specified in the KML file. For the first experiments I just used GIMP to split the images, but later Oleg made a script with ImageMagick to do it automatically. One pixel size is small compared to the full image, but correct tiling should repeat the border pixels between the next tiles, same is true for the first and last pixel rows/columns – they should “roll over”. And as JPEG images are not always correctly processed when the image size is not multiple of 8 (block size), the tile size before adding extra row/column should be 8*n-1, so we adjusted the Hugin output accordingly and used TIFF (no problems with arbitrary image size) as the output. The tiling script was taking the full panorama tiff (14268×7134), splitting it into 3567×3567 images and adding extra row and column (from the next image) to the output of 3568×3568 tiles. If the tiling does not repeat the border pixels it will be clearly visible on the panorama interpolation when the zoom is set high enough.
An old method of orientation — use the Sun
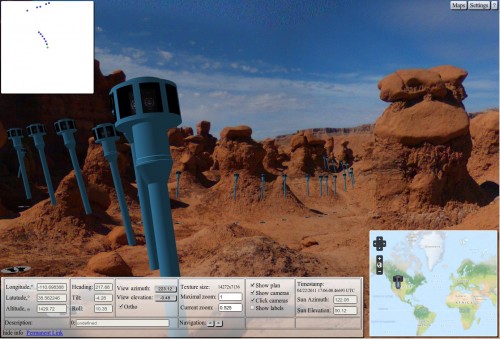
While we could use (to some degree of success) the GPS data for orienting the camera when mounted on a car (camera is rigidly attached to the car, and car is pointed from the current camera location to the next one when going straight), it is much more difficult with a backpack – the “forward” direction of the camera is just somewhat related to the vector connecting camera positions, we also noticed that in many cases the camera was significantly tilted sideways, not just forward that was inherent to the simple backpack mount we made. Luckily for us it is usually sunny in the Southern Utah and we know the location and the time when the images where captured, so it is possible to calculate where (azimuth, elevation) the Sun should be visible. Quick search got us to the NOAA Sun Position Calculator that has all the calculations in the Javascript code. So Sebastian just extracted the web page code to a sunpos.js file that we could incorporate into the software for panorama set editor. Initial testing failed – the Sun azimuth was to the North and elevation – negative, then I looked at the original NOAA page and found that it was expecting longitude to be positive for the West and negative – for the East. Of course, it is an American agency, but I still expected the sign of the longitude to be opposite to that. That problem fixed and we had a nice spot on many of the images that we could use when orienting the panoramas.
Processing the Imagery: Little Wild Horse Canyon
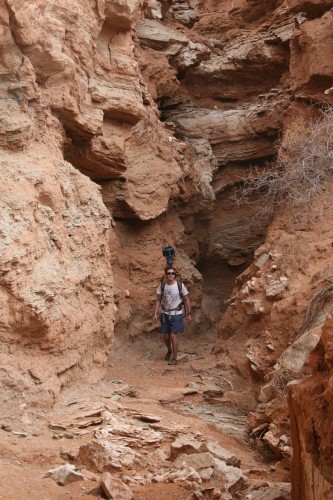
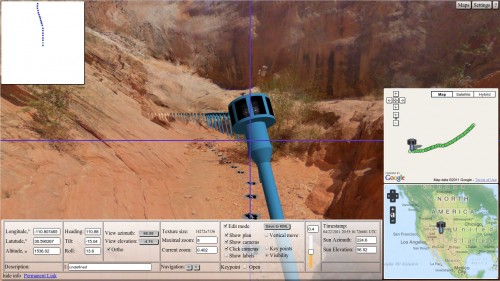
As soon as the software got some functionality we started testing it on the two sets of the images. One was made in a very narrow canyon where GPS gave up at the very entrance, no view of horizon, even the Sun was obscured in most places but the task was somewhat simplified by the fact
that the camera path was essentially a “2-d” one – the small processed segment has virtually constant (slowly increasing) altitude. Images were captured at just 1.25 frames per second, but the compression quality was set too high – in some places the internal image memory buffer was overrun and a few panoramas were lost, it happened in the narrow places where all the sub-cameras field of view were filled with detailed rocks, compressed file sizes went above 2.5MB for 5MPix sub-images.
This set consists of 164 individual panoramas captured on a small (~150m) segment of the canyon. The images were captured with odd/even alternating exposure settings (4:1 ratio). As the camera was moving it is not possible to combine those images into HDR ones, they only can be used to switch manually to the close by spot shot at different conditions. Eventually we plan to use such alternating brightness images in the future 3-d reconstruction – in that case it will be relatively easy to combine both image sub-sets into a single HDR 3-d model.
The images show some of the problems with the first generation Eyesis camera designed to be mounted on a car when used attached to a backpack. One quarter of the whole sphere is lost around nadir (below 30 degrees from the horizon), the top quarter is covered by a single fisheye lens having much smaller resolution than the eight side-pointed sub-cameras. Those problems were exaggerated by the severe tilting of the camera (in some places by nearly 30 degrees) that raised the nadir spot to near horizon, same with the low-resolution top camera. When processing the images we paid less attention to the fisheye camera – in the next Eyesis-4π camera all the channels will have the same high resolution, they will all have the same angular resolution. The “nadir hole ” will also be covered by additional 8 sensors pointed downwards.
Processing the Imagery: Goblin Valley
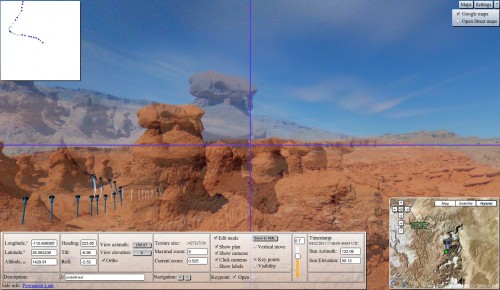
The other image set was captured in the Goblin Valley – GPS showed meaningful data most of the time (lost just once when too close to the rock wall), just the altitude was unusable. It was rather easy to level the panoramas using the Sun and the far features, those features could be used for aligning panoramas to each other – selecting one as a reference and then mixing two panoramic images by adjusting their transparencies with a slider. And when matching the far features on the pairs of the panoramas, there were small (~1-2°) errors visible. Some of those errors were caused by the imperfection of the Hugin templates we created (in the final software we’ll have precise pixel mapping, so we considered the manual stitching as a temporary solution), others were due to the rolling shutter (ERS) effect in the heavily rotating camera. We’ll be able to separate those effects and mitigate them when we’ll finish the static optical distortion calibration of the camera lenses and use the IMU data to measure camera rotation during image acquisition.
There also image processing artifacts visible. We did not use any regular de-noise filters included with most image processing/editing programs to evaluate our aberration correction program itself. Most visible artifacts are caused by the top fisheye (“noisy” sky). The main source is the underexposure of the fisheye channel. Fisheye lens has higher F-number than the side ones and the current software applied the same exposure value to the group of the 3 sensors, so the pixel value range for that channel was only a half of that of the other channels. The sharpening process amplifies the noise – and the filtering parameters were adjusted for the fisheye lens not as good as the ones for the other lenses (there are some known improvements left to be done for them also). The poor quality in the top part of the panoramas was one of the reasons we decided to use different optical layout for the Eyesis-4π, so this is just a temporary problem.
Supplementing IMU with the two additional sub-cameras
While working on the IMU integration with the Eyesis camera, we were thinking of supplementing the inertial data with the additional optical sensors (just extra camera sub-modules identical to the ones used for the panorama image acquisition). The 3-d reconstruction we plan to implement will combine images made from the different camera locations while it is moving, not from the stereoscopic system. For that we need precise knowledge of the camera relative position and orientation, and for the CMOS sensors prone to the ERS distortion we need to know the camera position/orientation during each frame acquisition.
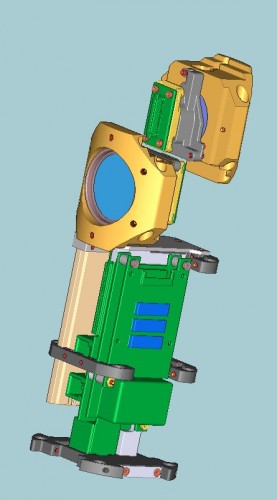
Most of the position measurement will be done using the IMU data logged at 2400 samples/sec, but we’ll have additional pair of camera subunits located inside the camera tube body (73mm diameter) that is used to carry camera electronic modules and SDD data storage, near the lower end of it, approximately one meter below the main camera sensors. The pair of additional lenses will be pointed sideways and have FOV overlap with the cameras above them. With the sensors oriented in “portrait” mode (vertical scan lines) and synchronized scanning the same features on the main and additional sensors will be captured at the same time – that will simplify distance measurement when the whole camera is in the motion and rotation. Correlating the same features in two (or more) stereo pairs (consisting of the main and additional images) will provide the relative positional information to be combined with the inertial data and used for the 3-d reconstruction in the other areas, not just in the overlap FOV. Two opposite-pointed camera modules (instead of just one) improve the measurement precision (by reducing partial ambiguity between movement and rotation) and help in the cases when the view in one direction is obstructed (i.e. by the moving traffic). Of course, sometimes both views can be obstructed by the moving traffic, but we will still have the inertial and GPS measurements available.
So for the planned 3-d reconstruction we do not need to double the number of sensors and have stereo-panoramic camera – it is sufficient just to have stereo measurements in some areas for precise positional data.
Links to the panorama sets
The program (webgl_panorama_editor.html) uses (and modifies in edit mode) the KML file that keeps each camera location, orientation, comments, acquisition time stamp and the image link (actual image filenames are modified during tiling). Additionally this file holds the “3d visibility ranges” – this data, the view only/edit mode is determined by the file permissions, if it is read only – program works as a viewer, if write is permitted – it works in the edit mode. This file is specified as a parameter in the URL string, i.e.
...&kml=map_goblins_06.kml

...&kml=map_goblins_06_readonly.kml (copy of the map_goblins_06.kml with writing disabled)
It is possible to specify additional kml file that is used to overwrite some settings of the main one, i.e.
&mask=map_goblins_mask_light.kml (or &mask=map_goblins_mask_dark.kml or &mask=map_goblins_mask_all.kml)
The program uses image names as keys and overwrites all the original KML file values in the response from the back end PHP script (map_pano_02.php). In the viewer mode it is used just to specify visibility of the alternating exposure nodes – make all visible (*_light.kml), only those acquired with long exposure time (*_light.kml) or those with the short – *_light.kml . There are more settings that can be passed via the URL parameters, they can be generated from inside the program itself.
So here are the viewer (read only) mode links:
1. Goblin Valley set (83 panoramas) – dark, light and all frames :
webgl_panorama_editor.html?kml=map_goblins_06_readonly.kml&mask=map_goblins_mask_dark.kml&azimuth=230

webgl_panorama_editor.html?kml=map_goblins_06_readonly.kml&mask=map_goblins_mask_light.kml&azimuth=230

webgl_panorama_editor.html?kml=map_goblins_06_readonly.kml&mask=map_goblins_mask_all.kml&azimuth=230
2. Little White Horse Canyon set (164 panoramas) – dark, light and all frames :
webgl_panorama_editor.html?kml=map_lwhc_14_readonly.kml&mask=map_lwhc_mask_dark.kml&azimuth=90

webgl_panorama_editor.html?kml=map_lwhc_14_readonly.kml&mask=map_lwhc_mask_light.kml&azimuth=90

webgl_panorama_editor.html?kml=map_lwhc_14_readonly.kml&mask=map_lwhc_mask_all.kml&azimuth=90
Editor mode:
Editor mode involves creating a copy of the original kml file that you can modify. The directory http://community.elphel.com/files/eyesis/webgl-panorama-editor/kml_files/ is open for writing, you can start with the same KML file as in the viewer example or with one of the files in the kml_files directory (the mask file if present should match the data set – Goblins Valley or Little Wild Horse Canyon). You may specify a name for the new kml file (the name should start with “kml_files/” and end with “.kml”) and use “&proto=map_goblins_06_readonly.kml” (or “&proto=map_lwhc_14_readonly.kml”) for the original KML file that will be copied to the new one, i.e.
webgl_panorama_editor.html?proto=map_lwhc_14_readonly.kml&map=all&kml=kml_files/my_new_lwhc.kml
That link will copy “map_lwhc_14_readonly.kml” to a new file that you can modify – “kml_files/my_new_lwhc.kml”. If “kml_files/my_new_lwhc.kml” already exists, it will just use it as is without copying “map_lwhc_14_readonly.kml” over, if the file copying would fail, the original file (in this example – “map_lwhc_14_readonly.kml”) will be used in read only mode (editing controls disabled), that can happen if the specified new KML file name does not match the requirements (i.e. is not inside “kml_files” directory, does not end with “.kml” or just is not a good name for the operating system). You may also verify that the new file is created (or download it) by opening http://community.elphel.com/files/eyesis/webgl-panorama-editor/kml_files/ page in the browser. It is also possible to specify the file names inside the program by opening the “Settings” dialog – just enter the “kml_files/*.kml” in the KML file input field and the original file into the KML prototype one.
Similarly, to edit Goblin Valley panorama set, you may use the following link (just modify the name of a new KML file):
The code is in Elphel Sourceforge Git repository – http://elphel.git.sourceforge.net/git/gitweb.cgi?p=elphel/webgl_panorama_editor;a=tree
[…] Andrey Filippov — panaramas from US National Parks taken from a backpack-mounted camera. Posted in Links, Roundups | « WebGL around the net, […]